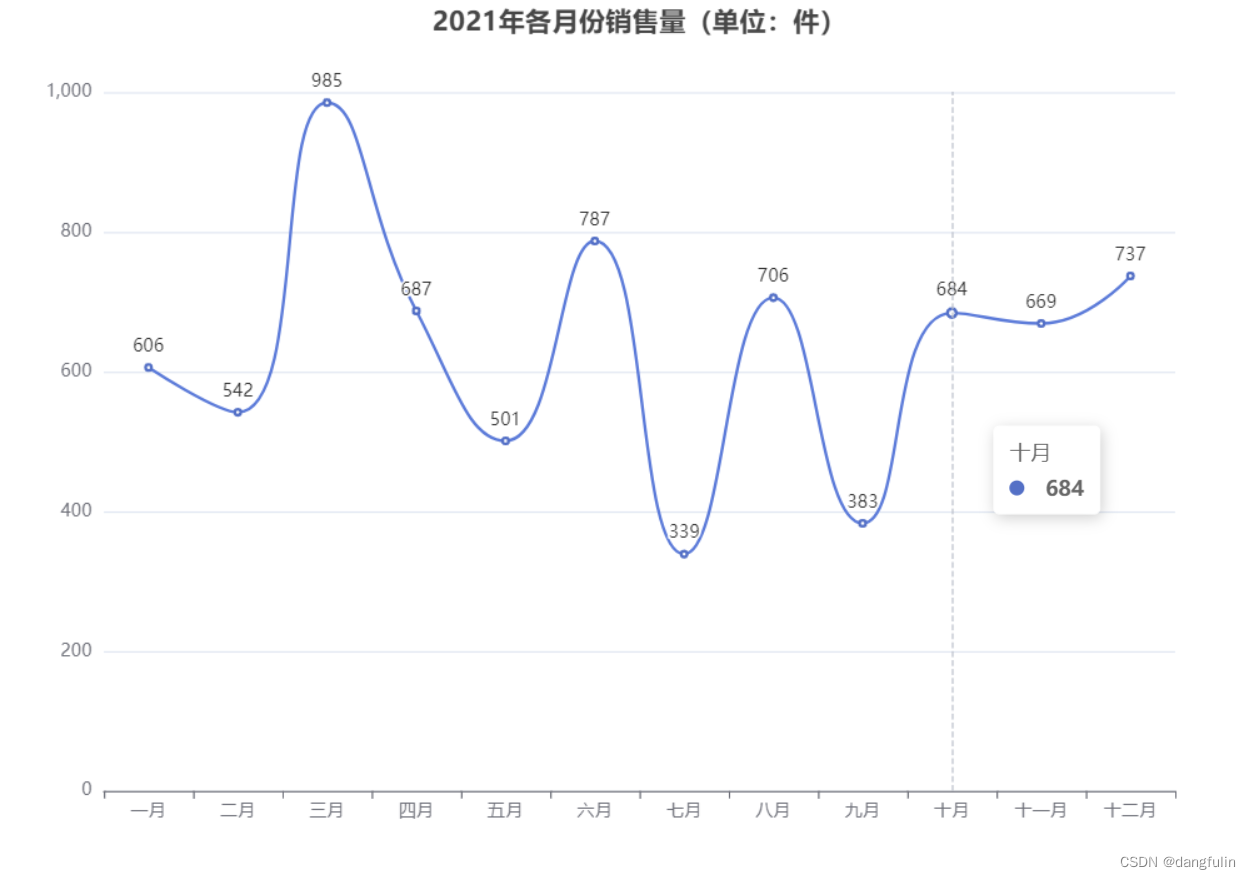
echarts自动轮播tooltip
vue首先需要封装tools.js的包(函数):
export function autoHover(myChart, option, num, time) {
    var defaultData = {
        // 设置默认值
        time: 2000,
        num: 100
    }
    if (!time) {
        time = defaultData.time
    }
    if (!num) {
        num = defaultData.num
    }
    var count = 0
    var timeTicket = null
    timeTicket && clearInterval(timeTicket)
    timeTicket = setInterval(function () {
        myChart.dispatchAction({
            type: 'downplay',
            seriesIndex: 0 // serieIndex的索引值   可以触发多个
        })
        myChart.dispatchAction({
            type: 'highlight',
            seriesIndex: 0,
            dataIndex: count
        })
        myChart.dispatchAction({
            type: 'showTip',
            seriesIndex: 0,
            dataIndex: count
        })
        count++
        if (count >= num) {
            count = 0
        }
    }, time)
    myChart.on('mouseover', function (params) {
        clearInterval(timeTicket)
        myChart.dispatchAction({
            type: 'downplay',
            seriesIndex: 0
        })
        myChart.dispatchAction({
            type: 'highlight',
            seriesIndex: 0,
            dataIndex: params.dataIndex
        })
        myChart.dispatchAction({
            type: 'showTip',
            seriesIndex: 0,
            dataIndex: params.dataIndex
        })
    })

    myChart.on('mouseout', function () {
        timeTicket && clearInterval(timeTicket)
        timeTicket = setInterval(function () {
            myChart.dispatchAction({
                type: 'downplay',
                seriesIndex: 0 // serieIndex的索引值   可以触发多个
            })
            myChart.dispatchAction({
                type: 'highlight',
                seriesIndex: 0,
                dataIndex: count
            })
            myChart.dispatchAction({
                type: 'showTip',
                seriesIndex: 0,
                dataIndex: count
            })
            count++
            if (count >= 17) {
                count = 0
            }
        }, 3000)
    })
}
export default {
    autoHover
}
最好把这个js文件放到utils文件夹下,其他组件可能也需要用到,作为一个公共的函数;
在vue组件中引入使用:
import { autoHover } from '@/utils/tool.js'	// 引入封装的函数

export default {
  mounted() {
    this.initLine()
  },
  methods: {
    // 折线图
    initLine() {
      var myChart = echarts.init(document.getElementById('manyLine'));
      let option = {
      // ......此配置省略
      }
      myChart.setOption(option, true);
      // 自动轮播
      autoHover(myChart, this.option, 4, 3000); // 参数分别为:容器,配置,轮播数量,轮播间隔时间
    }
  }
}
Echarts大屏饼图(可自动轮播)
API:
highlight启动高亮downplay关闭高亮
设置定时器:逐个开启饼块的高亮(注意:在开启下一个前将上一个高亮关闭)
import * as echarts from 'echarts';

var chartDom = document.getElementById('main');
var myChart = echarts.init(chartDom);
var option;

option = {
  title: {
    text: 'Referer of a Website',
    subtext: 'Fake Data',
    left: 'center'
  },
  tooltip: {
    trigger: 'item'
  },
  legend: {
    orient: 'vertical',
    left: 'left'
  },
  series: [
    {
      name: 'Access From',
      type: 'pie',
      radius: '50%',
      data: [
        { value: 1048, name: 'Search Engine' },
        { value: 735, name: 'Direct' },
        { value: 580, name: 'Email' },
        { value: 484, name: 'Union Ads' },
        { value: 300, name: 'Video Ads' }
      ],
      emphasis: {
        itemStyle: {
          shadowBlur: 10,
          shadowOffsetX: 0,
          shadowColor: 'rgba(0, 0, 0, 0.5)'
        }
      }
    }
  ]
};
let count = 0;
setInterval(() => {
  myChart.dispatchAction({
    type: 'downplay',
    seriesIndex: 0,
    dataIndex: count
  });
  count++;
  if (count === 5) {
    count = 0;
  }
  myChart.dispatchAction({
    type: 'highlight',
    seriesIndex: 0,
    dataIndex: count
  });
}, 5000);

option && myChart.setOption(option);
提示:若在vue组件中复用组件引入option配置时,注意将与相关的echarts实例传给父组件,使用对应的实例myChart进行操作,如下案例:
chart.vue 可复用组件: 挂载完成后将Echarts实例chart传给父组件
<script>
import * as echarts from 'echarts'
import 'zrender/lib/svg/svg'
import { debounce } from 'throttle-debounce'
export default {
  name: '',
  props: ['option', 'renderer', 'notMerge', 'lazyUpdate'],
  data () {
    return {
      width: '100%',
      height: '100%',
    }
  },
  watch: {
    option (val) {
      this.setOption(val)
    },
  },
  created () {
    this.chart = null
  },
  async mounted () {
    // 初始化图表
    await this.initChart(this.$el)
    // 向父组件传递chart实例
    this.$emit('send', this.chart)
    // 将传入的配置(包含数据)注入
    this.setOption(this.option)
    // 监听屏幕缩放,重新绘制 echart 图表
    window.addEventListener('resize', debounce(100, this.resize))
  },
  updated () {
    // 每次更新组件都重置
    this.setOption(this.option)
  },
  beforeDestroy () {
    // 组件卸载前卸载图表
    this.dispose()
  },
  methods: {
    initChart (el) {
      // renderer 用于配置渲染方式 可以是 svg 或者 canvas
      const renderer = this.renderer || 'canvas'
      return new Promise(resolve => {
        setTimeout(() => {
          this.chart = echarts.init(el, null, {
            renderer,
            width: 'auto',
            height: 'auto',
          })
          resolve()
        }, 0)
      })
    },
    setOption (option) {
      if (!this.chart) {
        return
      }

      const notMerge = this.notMerge
      const lazyUpdate = this.lazyUpdate

      this.chart.setOption(option, notMerge, lazyUpdate)
    },
    dispose () {
      if (!this.chart) {
        return
      }

      this.chart.dispose()
      this.chart = null
    },
    resize () {
      this.chart && this.chart.resize()
    },
    getInstance () {
      return this.chart
    },
  },
  render () {
    const { width, height } = this
    return (
      <div
        class='default-chart'
        style={{ width, height }}
      />
    )
  },
}
</script>
饼状图组件:on-send监听子组件触发的send方法,并执行相应的方法
<script>
import SubTitle from './SubTitle'
import Chart from '../Chart'
export default {
  name: '',
  data () {
    return {
      myChart: null,
      option: 省略...(与上文option设置相同 可复制于此)
    }
  },
  mounted () {
    this.$nextTick(() => {
      this.pieActive()
    })
  },
  methods: {
    // 饼状图轮播
    pieActive () {
      let count = 0
      let length = this.option.series[0].data.length
      setInterval(() => {
        this.myChart.dispatchAction({
          type: 'downplay',
          seriesIndex: 0,
          dataIndex: count,
        })
        count++
        if (count === length) {
          count = 0
        }
        this.myChart.dispatchAction({
          type: 'highlight',
          seriesIndex: 0,
          dataIndex: count,
        })
      }, 5000)
    },
    getChart (chart) {
      this.myChart = chart
    },
  },
  render () {
    return (
      <div style="height:250px;width:480px;position:absolute;left:1402px;top:772px;display:flex;flex-direction: column;">
        <SubTitle title="省份销售占比图"/>
        <div style="flex: 1; position: relative;">
          <Chart option={this.option} on-send={this.getChart} style="position: absolute;top: 10px;"/>
        </div>
      </div>
    )
  },
}
</script>

<style lang="scss" scoped></style>
以上为个人经验,希望能给大家一个参考,也希望大家多多支持阿兔在线工具。


