Ⅰ、Vuex 简介:
1、Vuex 是什么?
答:Vuex 是一个专为 Vue.js 应用程序开发的状态管理模式;
而所谓状态就是指:组件中所维护的数据);
(简而言之:就是状态管理,解决复杂组件数据通信,状态共享;)
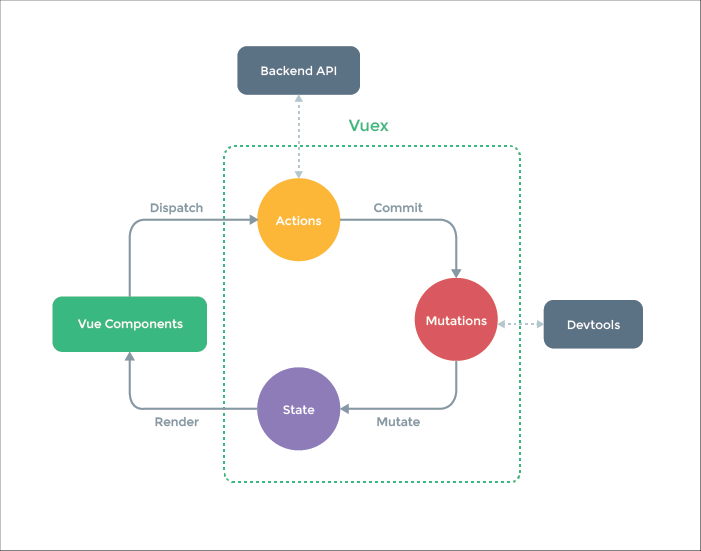
2、Vuex 的图例讲解:

其一、对 Vue Components 的理解:
Vue Components 是指:一个组件(如:compA.vue);
其二、对 State 的理解:
State 是指:存放数据的(数据最终是展示(render)在组件的模板(视图)中);
其三、对 Mutations 的理解:
Mutations 是指:用来存放修改方法的(且是同步的);
且 Vue Components 可以通过 commit 来修改 Mutations;
其四、对 Actions 的理解:
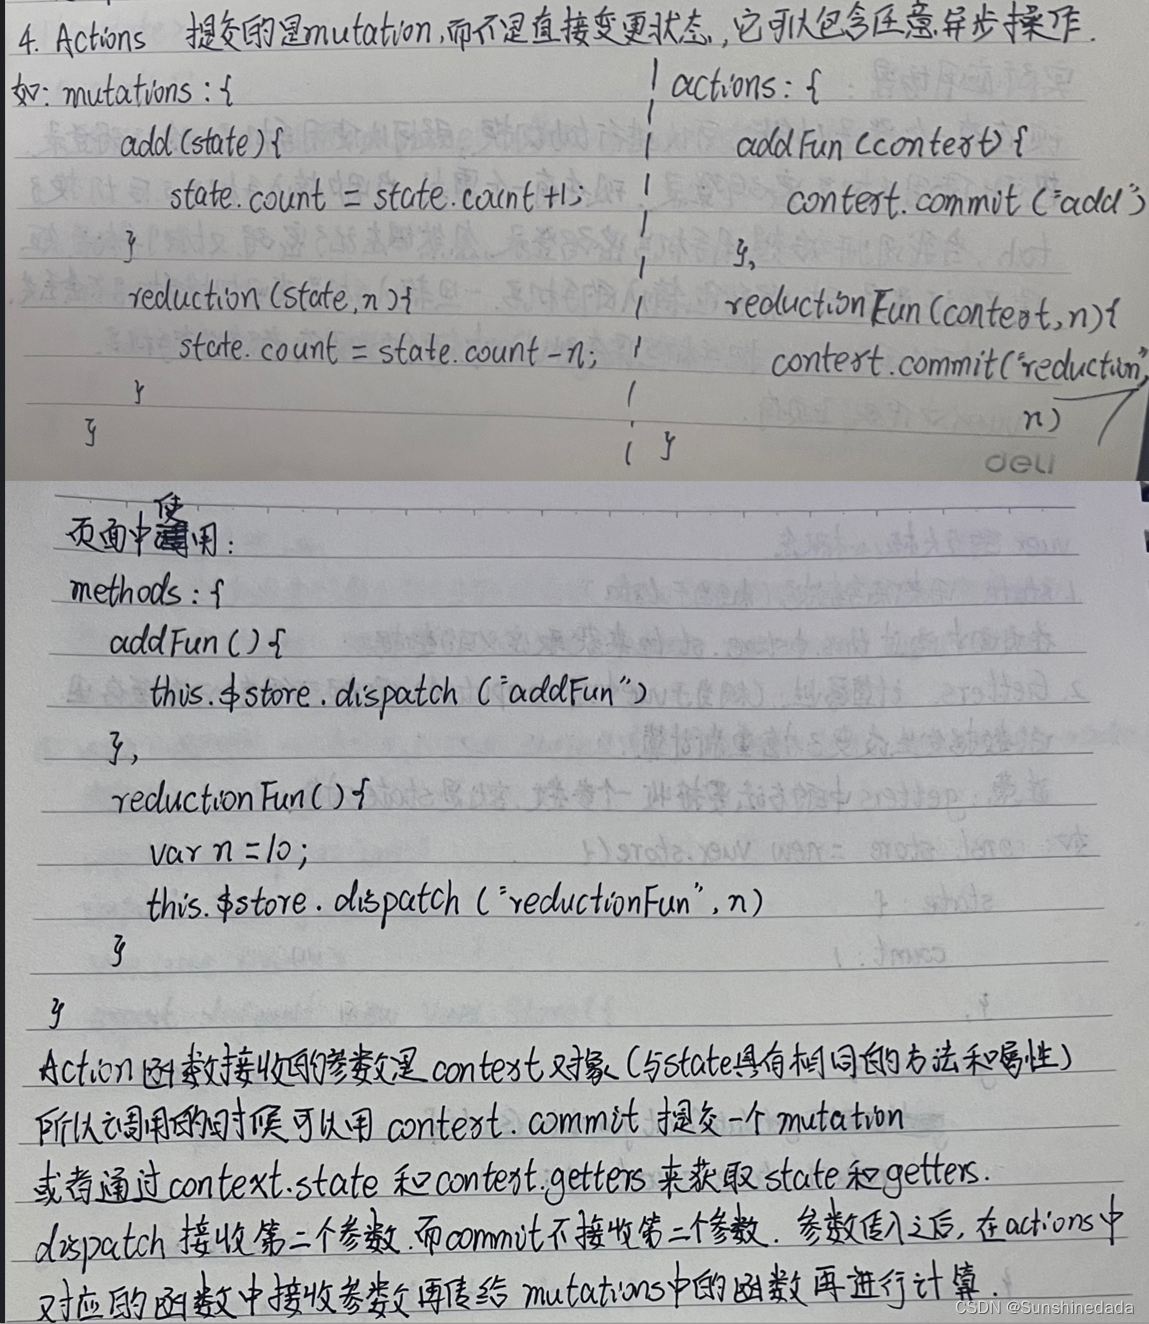
Actions 是指:用来放异步操作的(如:ajax 请求);
且 Vue Components 可以通过 dispatch 派发 Action 的异步请求;
同时: Action 可以直接获取接口: Backend API, 或通过 Commit 来修改 Mutations 从而修改 State 数据;
3、Vuex 的配置过程:
其一、选择并下载 Vuex 版本的过程中:
注意:Vue2 是与 Vuex3相匹配的,而 Vue3 是与 Vuex4 相匹配的;
其二、打开终端并输入命令:
npm i vuex@3
Ⅱ、如何引入并使用 Vuex :
1、用 vue-cli 创建项目;
2、在 src 下建一个 store 文件夹并创建 index.js 文件;
其一、建成的文件夹如下所示:

其二、index.js 里面引入的 vuex 的代码为:
import Vue from 'vue'
import Vuex from 'vuex'

Vue.use(Vuex)  // 注意:一定要用 Vue.use() 注册一下;

const store = new Vuex.Store({   /* 此时的 Vuex.Store 就是一个构造函数(即:相当于一个实例); */
  // 定义状态的地方;
  state: {
    num: 1,
    school: {
        name: 'xuexiqianduan',
        age: 26
    }
  },
})

export default store
// 此时是导出 store 文件,便于挂载;
3、要在 main.js 文件中挂载一下:
import Vue from 'vue'
import App from './App.vue'
import store from './store'

Vue.config.productionTip = false

new Vue({
  store, /* 挂载到实例完成后,在 vue 项目的任何地方就都可以使用 store */
  render: h => h(App),
}).$mount('#app')
4、然后在 App.vue 中使用;
Ⅲ、实例剖析在 App.vue 中使用 state 的过程:
1、方式一:通过 $store.state.num 拿到数据;
其一、 此时的 App.vue 的代码为:
<template>
  <div id="app">
    <h1>真实用法:展示Vuex中的State</h1>
    <p>方式一: num: {{ $store.state.num }}</p>
     <!-- '$store'就是指:拿到已经挂载到实例上的 store 下的 index.js 的内容; -->
  </div>
</template>
<script>
export default {
  computed: {
  }
}
</script>
<style>
#app {
  font-family: Avenir, Helvetica, Arial, sans-serif;
  -webkit-font-smoothing: antialiased;
  -moz-osx-font-smoothing: grayscale;
  text-align: center;
  color: #2c3e50;
  margin-top: 60px;
}
</style>
其二、页面的展示效果为:

其三、而此时 index.js 中的 num 的值为:
(即:已成功拿到了 index.js 中的 num 值;)

2、方式二:通过 {{ num }} 拿到数据;
其一、 此时的 App.vue 的代码为:
<template>
  <div id="app">
    <h1>真实用法:展示Vuex中的State</h1>
    <p>方式二: num: {{ num }}</p>
  </div>
</template>
<script>
export default {
  computed: {
    num() {
      return this.$store.state.num;
    },
  }
}
</script>
<style>
#app {
  font-family: Avenir, Helvetica, Arial, sans-serif;
  -webkit-font-smoothing: antialiased;
  -moz-osx-font-smoothing: grayscale;
  text-align: center;
  color: #2c3e50;
  margin-top: 60px;
}
</style>
其二、页面的展示效果为:

其三、而此时 index.js 中的 num 的值为:
(即:已成功拿到了 index.js 中的 num 值;)

3、方式三:通过 {{ num }} {{school.name}} 拿到数据;
其一、 此时的 App.vue 的代码为:
<template>
  <div id="app">
    <h1>真实用法:展示Vuex中的State</h1>
    <p>方式三:num: {{ num }}  school: {{ school.name }}</p>
  </div>
</template>
<script>
import {mapState} from 'vuex'
export default {
  computed: {
    ...mapState(['num','school']),
    // 该函数内部运行的返回值大致为:{num: () => this.$store.state.num, school: () => this.$store.state.school}
  }
  }
}
</script>
<style>
#app {
  font-family: Avenir, Helvetica, Arial, sans-serif;
  -webkit-font-smoothing: antialiased;
  -moz-osx-font-smoothing: grayscale;
  text-align: center;
  color: #2c3e50;
  margin-top: 60px;
}
</style>
其二、页面的展示效果为:

其三、而此时 index.js 中的 num 的值为:
(即:已成功拿到了 index.js 中的 num 值;)

Ⅳ、小结:
到此这篇关于Vuex拿到state中数据的3种方式与实例剖析的文章就介绍到这了,更多相关Vuex拿到state数据内容请搜索阿兔在线工具以前的文章或继续浏览下面的相关文章希望大家以后多多支持阿兔在线工具!


